 Hosting a website on your PC can be very interesting. I host my website in my windows tab DELL VENUE 8 PRO with windows 8.1 Pro using JIO ROUTER JIOFI 3. Some ISP’s blocks port 80, but with JIO you can run your own webserver as port 80 is not blocked by JIO. We need to do port forward to port 80. To know how to forward port 80 in JIOFI3 check https://amitsblog.xyz/wp/2018/11/05/port-forwarding-in-jiofi3-router/
Note : JIO is not providing static ip. You will have to update your ip when it changes
As Jio use IPv6 instead of IPv4. Thats why pubic IPv4 is not accessible. We can run the server using IPv6.
I am using WAMP server version 2.5 (32 bit). Link to download wamp.
- Download the wamp server . Before installing wamp, install vcredist_x86 (Microsoft Visual C++ 2010 Redistributable Package x86). After installing wamp, we need to update httpd.conf file placed at C:\wamp\bin\apache\apache2.4.9\conf folder. Download File httpd and replace it with httpd.conf file.
- By default wamp allow you to post a file with size 2M only. If you want to change it (say 1 GB in my case), download php.ini file php and replace it with C:\wamp\bin\apache\apache2.4.9\bin\php.ini.
- To open phpmyadmin, phpsysinfo, sqlbuddy, webgrind remotely, download link all files and replace in folder C:\wamp\alias. Restart the wamp server.
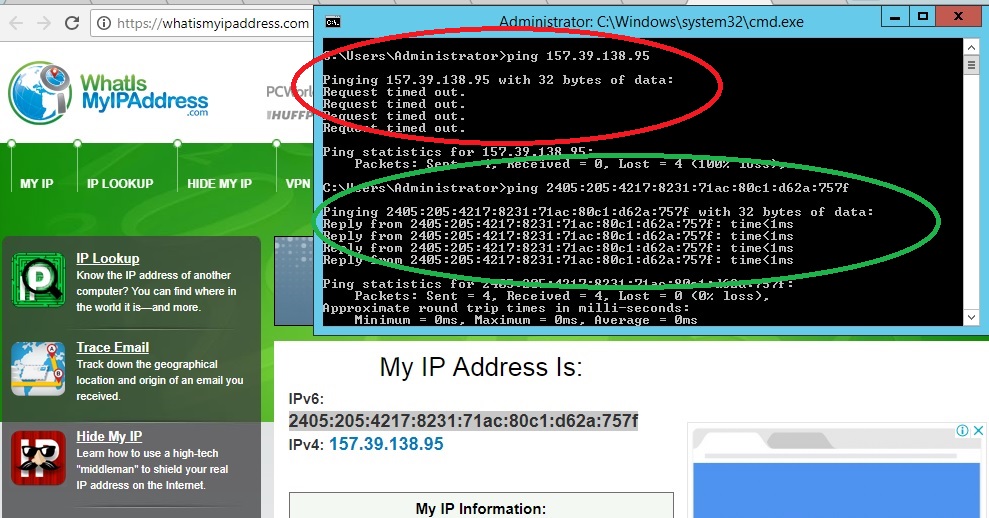
- Now open your browser and check ipv6 address, as below and ping ipv6.

- Open browser to another PC with different IP and enter ipv6 as follows : [2405:205:4217:8231:d0d2:ee82:9323:e76e] and press enter. It opens the page as :

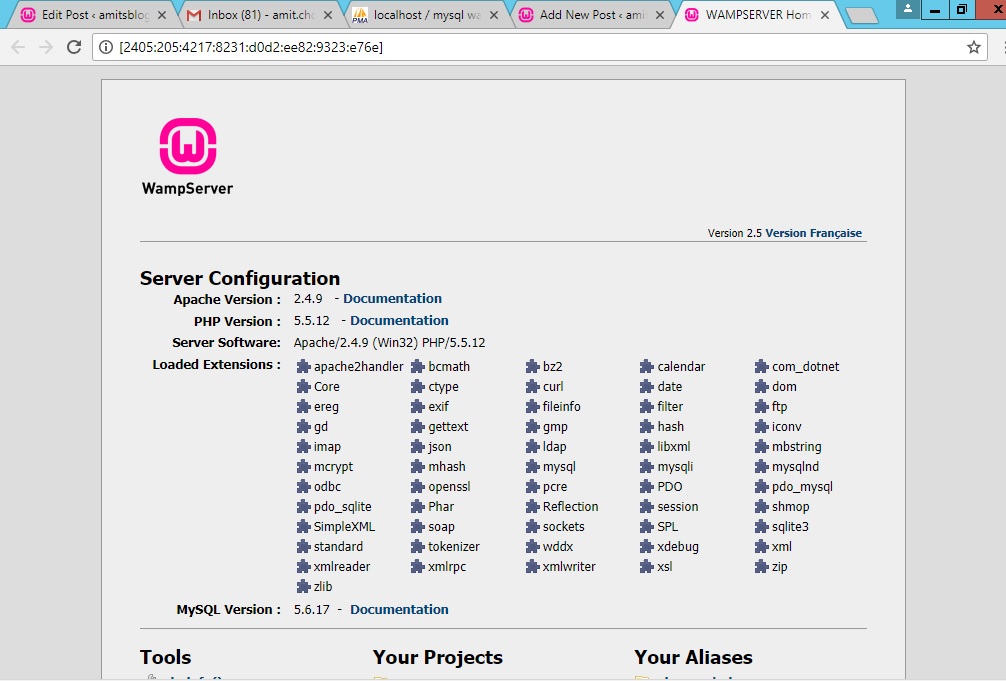
That’s it, It means your webserver is ready. Now you can purchase a domain from domain registrars. It takes about 2-3 days to propagate your domain. Login to domain dashboard and open DNS zone and enter your IPv6 record. It takes some time to point your domain to your server ip.
To know how to point your domain to your server visit my post https://amitsblog.xyz/wp/2018/08/26/choose-a-domain-for-your-home-server-with-jiofi3/
Hey Amit,.,..,.,..I wanted to know whether a jiofi hosted website can handle a high traffic..,.??
Thank you
No way dear. Even shared hosting plans are not able to handle high traffic. Moreover cheap hosting plans are not able to handle moderate traffic. So jiofi is never a substitute of hosting plans.
Hosting a website in jiofi is just a fun. Many bots attack your website cause down your server for many hours. Home security is a risk. The reason to host your website at home is just to learn how it all works.
Cool,.,..,..,. Thanks for the reply sir,.,.,.
It cleared a fine I had for ages 🙂
sir ,i am trying this with jio sim …it is not working plz help me . i have followed all steps properly but not working.
It works.
What issues you found?
Which router you are using ?
You must forward port 80 to allow traffic to get through the computer.
there are 2 scripts server.py and client.py . The client can be connected to the server only in same network i.e if both the scripts are running with same internet connection. but if i want to connect the server from anywhere, with the client script, what should i do in that condition.
Please help me. And thank you.
Sorry for late reply, Actually I forget to check comments.
Before starting python Use command
netstat -an |find /i “listening”
from command prompt to check opened ports. Thereafter start python from GUI and run the above command again. Now check port used by python. As in my case check from
http://amitsblog.xyz/wp/scan/
Now forward the port used by python in server from your router.
May it works for you.
Hello,
I plan to run a CCTV system using JioFi
I only want to access the live stream from the camera.
Is this possible over jioFi ? I will use another JioFi to access the internal network.
The live stream is on port 8080.
Sorry I never tried it.